Set up the Semgrep Network Broker
The Semgrep Network Broker facilitates secure access between Semgrep and your private network. The Network Broker creates a WireGuard VPN tunnel to the Semgrep backend and proxies inbound HTTP requests from Semgrep to the customer through the tunnel. This allows Semgrep to communicate with private network resources like a Source Code Manager (SCM) without exposing them to the public internet.
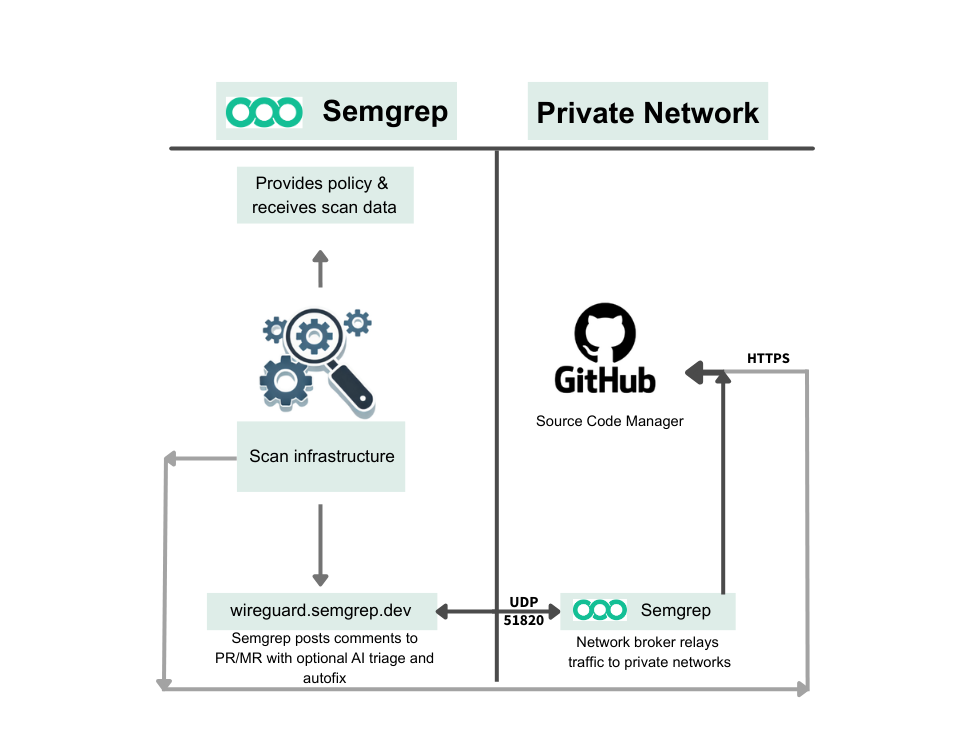
Figure. Overview of how Semgrep Network Broker facilitates access between Semgrep and your private network.
Examples of inbound traffic include:
- Pull request comments
- Code access for Semgrep Managed Scans if enabled
- Webhooks
Feature Availability
The Semgrep Network Broker is available to Enterprise tier users.
The Semgrep Network Broker is a feature that must be enabled in your Semgrep organization before setup. It is only available to paying customers. Contact the Semgrep support team to discuss having it enabled for your organization.
If you will be using the Network Broker with a dedicated Semgrep tenant, please note that in your request.
Deployment
The Network Broker can be run as a bare Docker container, in a Kubernetes cluster, or simply as a standalone binary on a machine.
Only one instance of the WireGuard-based Network Broker can be run at any time. Multiple brokers with the same configuration can cause disconnects, instability, and package loss.
System Requirements
- CPU: 1
- RAM: 512 MB
Network Requirements
- Between Semgrep and Broker:
- Allow traffic from
wireguard.semgrep.devon UDP port 51820. If you are on a dedicated Semgrep tenant, allow traffic fromwireguard.<tenant-name>.semgrep.devinstead. - If using the
--deployment-idCLI flag, allow outbound tosemgrep.devon TCP port 443 for HTTPS.
- Allow traffic from
- Between Broker and each private network resource, enable outbound on TCP ports 80 and 443 for HTTP/HTTPS communication.
To determine the IP addresses for a domain, use dig. The addresses are listed under the ANSWER section. Example: dig wireguard.semgrep.dev
Artifacts
You can choose between deploying pre-made artifacts or building your own.
Pre-built by Semgrep
- Docker images are available from ghcr.io/semgrep/semgrep-network-broker.
- A sample Kubernetes Manifest is present within the repository. This should be extended for production.
Build Yourself
See the Network Broker repository's README for instructions on how to build it yourself.
Configure Semgrep Network Broker
Ensure that you are logged in to the server where you want to run Semgrep Network Broker. Complete the following steps while logged in to that server.
1. Create the config file
- v0.25.0 and later
- v0.24.0 and earlier
- Sign in to Semgrep AppSec platform and navigate to Settings > Broker.
- Create a
config.yamlfile that contains the following starting configuration:inbound:
wireguard:
localAddress: SEMGREP_LOCAL_ADDRESS
peers:
- endpoint: wireguard.semgrep.dev:51820
Semgrep recommends that users running Network Broker v0.24.0 or earlier to upgrade to v0.25.0 or later. This enables the use of a simplified config file.
Create a config.yaml file similar to the following snippet, or copy a starting config from the Semgrep AppSec Platform at Settings > Broker. The steps required to generate values for the placeholders SEMGREP_LOCAL_ADDRESS, YOUR_PRIVATE_KEY, and YOUR_BASE_URL are provided in subsequent steps of this guide.
  inbound:
    wireguard:
      localAddress: SEMGREP_LOCAL_ADDRESS
      privateKey: YOUR_PRIVATE_KEY
      peers:
        - publicKey: 4EqJwDZ8X/qXB5u3Wpo2cxnKlysec93uhRvGWPix0lg=
          endpoint: wireguard.semgrep.dev:51820
          allowedIps: fdf0:59dc:33cf:9be9:0000:0000:0000:0001/128
    heartbeat:
      url: http://[fdf0:59dc:33cf:9be9:0000:0000:0000:0001]/ping
    allowlist: []
    gitlab:
      baseUrl: YOUR_BASE_URL
The publicKey value should be entered precisely as shown in the example:
4EqJwDZ8X/qXB5u3Wpo2cxnKlysec93uhRvGWPix0lg=
Add your local address to the config
- Convert your organization ID to hexadecimal. The organization ID is found in Semgrep AppSec Platform under Settings > General > Identifiers. This value is sometimes called a deployment ID. You can use a tool such as Decimal to Hexadecimal converter to perform the conversion if needed.
- Embed the resulting hexadecimal value in the string
fdf0:59dc:33cf:9be8:0:ORGANIZATION_ID:0:1, replacingORGANIZATION_IDwith the value. - Update the
localAddressfield ofconfig.yaml, replacingSEMGREP_LOCAL_ADDRESSwith the string you generated in Step 2.
inbound:
  wireguard:
    localAddress: fdf0:59dc:33cf:9be8:0:ORGANIZATION_ID:0:1
2. Generate and store your private key
The Network Broker requires a WireGuard keypair to establish a secure connection. To generate your private key:
- Determine the Network Broker version you want to use. The format should be similar to
v0.36.0. Most users should use the latest version, especially when setting up the broker for the first time. - Run the following command in your terminal to generate your private key, replacing the placeholder with the Network Broker version number:
docker run ghcr.io/semgrep/semgrep-network-broker:VERSION_NUMBER genkey - Store your private key in the config file by adding a
privateKeyfield underwireguardsection with its value set to the key you generated.
3. Share your public key with Semgrep
Your public key is safe to share. Never share your private key with anyone, including Semgrep.
- Run the following command in your terminal to generate your public key, replacing the placeholders with your private key generated in the previous step and the Network Broker version number:
echo "YOUR_PRIVATE_KEY" | sudo docker run -i ghcr.io/semgrep/semgrep-network-broker:VERSION_NUMBER pubkey
4. Add your public key to the Semgrep AppSec Platform
- Log in to Semgrep AppSec Platform.
- Navigate to Settings > Broker.
- Paste your public key and click Add Public Key.
5. Update the config with your SCM information
Update the config.yaml by replacing the SCM information containing YOUR_BASE_URL with your SCM and its base URL for Azure DevOps, GitHub, GitLab, or Bitbucket Data Center.
- Azure DevOps
- Bitbucket
- GitHub
- GitLab
inbound:
  azuredevops:
    baseURL: https://ADO_BASE_URL/*
Bitbucket is compatible with Network Broker versions 0.20.0 and later.
inbound:
  bitbucket:
    baseURL: https://BITBUCKET_BASE_URL/rest/api/latest
inbound:
  github:
    baseURL: https://GITHUB_BASE_URL/api/v3
inbound:
  gitlab:
    baseURL: https://GITLAB_BASE_URL/api/v4
6. Start the Network Broker
Run the following command to start Semgrep Network Broker with your completed configuration file:
sudo docker run -d -it --rm -v $(pwd):/emt ghcr.io/semgrep/semgrep-network-broker:VERSION_NUMBER -c /emt/config.yamlMultiple configuration files
You can overlay multiple configuration files by passing multiple -c arguments:
semgrep-network-broker -c config1.yaml -c config2.yaml -c config3.yaml
Note that arrays are replaced, while maps are merged.
Check Semgrep Network Broker logs
You can check the logs for Semgrep Network Broker by running:
sudo docker logs CONTAINER_IDAdjusting log verbosity
The Semgrep Network Broker can log details of the proxied requests and responses for troubleshooting. To log additional details, add this snippet to your broker configuration:
Please enable these settings only while working to identify issues. Otherwise, significant memory in the tunnel is used on large request and response bodies.
inbound:
  logging:
    logRequestBody: true
    logResponseBody: true
In the logs, this leads to entries for proxy.request and proxy.response.
These values can also be set on a per-allowlist basis:
inbound:
  allowlist:
    - url: https://httpbin.org/*
      methods: [GET, POST]
      logRequestBody: true
      logResponseBody: true
This provides additional flexibility when troubleshooting. See the broker README for more details.
Enable verbose WireGuard logging
To troubleshoot connection issues potentially related to the WireGuard configuration, you can enable verbose logging by adding the following snippet to the broker configuration:
inbound:
  wireguard:
    verbose: true
Use Semgrep Network Broker with Managed Scans
Semgrep Managed Scans uses Semgrep Network Broker to connect to your internal source code management instance.
To enable Managed Scans when using Network Broker, ensure that you've updated your SCM information to allow code access:
- Azure DevOps
- Bitbucket
- GitHub
- GitLab
inbound:
  azuredevops:
    baseURL: https://ADO_BASE_URL/*
    allowCodeAccess: true
Semgrep recommends providing the access token when you connect the source code manager instead of in the Network Broker configuration. However, if you must provide the token in the Network Broker configuration, see Prerequisites and permissions for access token requirements.
inbound:
  bitbucket:
    baseURL: https://BITBUCKET_BASE_URL/rest/api/latest
    allowCodeAccess: true
Semgrep recommends providing the access token when you connect the source code manager instead of in the Network Broker configuration. However, if you must provide the token in the Network Broker configuration, see Prerequisites and permissions for access token requirements.
inbound:
  github:
    baseURL: https://GITHUB_BASE_URL/api/v3
    allowCodeAccess: true
inbound:
  gitlab:
    baseURL: https://GITLAB_BASE_URL/api/v4
    allowCodeAccess: true
The Semgrep Network Broker supports repository cloning with GitHub when allowCodeAccess is true, beginning with Network Broker v0.32.0. For other source code managers, or earlier Network Broker versions the URL allowlist must include the base URL of your instance in order to clone repositories for scanning from any organization or group. For example, if your source code manager is at https://git.example.com/, the following allowlist will permit cloning repositories:
inbound:
  allowlist:
    # allow GET requests from Semgrep to https://git.example.com/*
    - url: https://git.example.com/*
      methods: [GET, POST]
Semgrep also creates and updates GitHub Checks when performing Managed Scans on pull requests. If you are running v0.30.0 or earlier of the Network Broker: to ensure checks can be both created and updated, add the PATCH method to the preceding allowlist example, or add a separate entry to allowlist check updates:
inbound:
  allowlist:
    # allow PATCH requests to update checks
    - url: https://git.example.com/api/v3/repos/:owner/:repo/check-runs/:id
      methods: [GET, POST, PATCH]
In Network Broker v0.31.0 and later, this URL is part of the default allowlist.
Run multiple instances of the Semgrep Network Broker
Do not attempt to run multiple instances of the Semgrep Network Broker to increase availability. Running multiple instances can result in contention and is less reliable than running a single instance.
Allowlist multiple source code managers with one configuration file
It is possible to allow access to multiple source code managers (SCM) within a single configuration file. One entry for a given SCM uses the SCM-specific key provided in the configuration file, as shown in the following example for a GitHub connection:
inbound:
  github:
    baseURL: https://GITHUB_BASE_URL/api/v3
Subsequent entries for the same SCM require you to modify allowlist and add specific information needed for the HTTP requests. The following is a sample allowlist for additional GitHub entries:
inbound:
  allowlist:
   - url: https://GITHUB_BASE_URL/api/v3/repos/:owner/:repo
      methods: [GET]
      setRequestHeaders:
        Authorization: "Bearer GITHUB_PAT"
   - url: https://GITHUB_BASE_URL/api/v3/repos/:owner/:repo/pulls
      methods: [GET]
      setRequestHeaders:
        Authorization: "Bearer GITHUB_PAT"
   - url: https://GITHUB_BASE_URL/api/v3/repos/:owner/:repo/pulls/:number/comments
      methods: [POST]
      setRequestHeaders:
        Authorization: "Bearer GITHUB_PAT"
   - url: https://GITHUB_BASE_URL/api/v3/:owner/:repo/issues/:number/comments
      methods: [POST]
      setRequestHeaders:
        Authorization: "Bearer GITHUB_PAT"
   ...
Not finding what you need in this doc? Ask questions in our Community Slack group, or see Support for other ways to get help.